Uncategorized
Office Fit out Insights for Australian Office Managers
Mar
The Complete Guide to Office Fitouts in Australia
If you are planning an office move, renovation or a full refit in Australia, you are in the right place. Office fitouts can feel overwhelming, especially when you are juggling budgets, staff expectations, landlords and compliance at the same time. Once you understand the basics, it becomes a structured project instead of a guessing game.
This guide walks you through how office fitouts work in Australia, what they mean for productivity and your brand, and how different cities, including Melbourne, Sydney and Brisbane, affect your planning and your costs.
What Is An Office Fitout In Australia?
Let us start with a clear definition, because terms get mixed up all the time.
An office fitout is the process of turning an empty or outdated commercial space into a functional, furnished and fully operational workplace that suits your business.
In practice, a fitout usually covers some or all of the following:
- Space planning and layout, where desks, offices, meeting rooms, breakout areas and storage are mapped out to support how your team actually works.
- Construction and finishes, such as partitions, flooring, painting, ceilings, doors and joinery.
- Services and infrastructure, including power, data, lighting, air conditioning modifications, fire services and acoustic treatment.
- Furniture and workstations, like desks, task chairs, storage, meeting tables, reception counters and soft seating.
- Technology integration, for data cabling, power rails, screen mounting, meeting room tech, charging and power access at workpoints.
- Brand and aesthetics, such as colour schemes, signage, graphics and feature joinery that reflect your business identity.
Fitouts usually fall into a few common categories.
- Shell or base building to full fitout. You start with an empty concrete shell, sometimes only with basic services in place, and build everything from layout to finishes and furniture.
- Spec suite or partial refit. The base layout already exists, and you update finishes, reconfigure some rooms and refresh the furniture.
- Furniture led refresh. You keep walls and services as they are, and focus on new workstations, chairs, storage and soft areas to support new ways of working.
Whichever category you are in, the goals are the same. You want a space that works, complies with Australian regulations and feels like a place your team wants to be in.
Why Your Office Fitout Matters For Productivity And Brand
It is easy to see a fitout as a cost you need to keep as low as possible. That mindset usually leads to awkward layouts, noise issues and spaces that age very quickly. A well planned fitout directly affects how your people work and how clients see your business.
Impact on productivity and day to day operations
A strong fitout design supports the way your team actually works, not some generic idea of an office. When you get this right, you see practical benefits.
- Better focus. Thoughtful zoning, acoustic treatment and desk layouts reduce noise bleed between focus work and collaborative areas.
- Smoother collaboration. The right mix of formal meeting rooms, small huddle spaces and open collaboration points means people are not fighting for rooms or using corridors as permanent meeting zones.
- Efficient circulation. Clear pathways and logical locations for shared resources, such as printers and lockers, cut down the constant small interruptions that add up across the week.
- Ergonomic comfort. Proper desks and seating reduce fatigue and discomfort. That supports consistent performance across the day.
- Support for flexible work. Hot desking, touchdown points and quiet rooms help you handle changing occupancy without chaos.
None of that happens by accident. It comes from making fitout decisions using clear criteria, which we will unpack in later sections of this guide.
Impact on brand, culture and hiring
Your office is the physical expression of how you run your business. People make fast judgments the moment they step inside, and your space can either support your story or fight against it.
- Client perception. The reception area, boardroom and informal meeting zones tell clients how organised, stable and detail focused you are.
- Staff morale. A well considered environment signals that you take people seriously, not just as headcount. Small details, such as proper breakout spaces or quality task chairs, send a clear message.
- Attraction and retention. In competitive Australian markets, especially in Melbourne and Sydney, candidates compare offices as part of their decision process. A tired or cramped space puts you on the back foot.
- Alignment with your brand. Colour, materials and layout can reinforce whether you are positioning as conservative, progressive, creative or highly technical.
If you want to see what this looks like in real products, you can browse modern reception and boardroom pieces on Officely, such as contemporary reception counters or dedicated meeting and boardroom tables that often form part of a broader fitout.
How The Australian Office Fitout Market Works
Office fitouts in Australia sit at the crossroads of commercial leasing, construction, design and workplace strategy. To plan properly you need to understand a few local realities.
Landlord, base building and tenancy conditions
Commercial leases in Australia usually separate the base building works from tenant works.
- Base building covers the core structure, main services and any standard finishes the landlord provides.
- Tenant fitout covers what you build inside your tenancy to meet your operational needs.
Your fitout scope and budget will be shaped by what the landlord includes, what they allow you to change and any make good obligations at the end of the lease. In some buildings, especially newer ones, there may be strict guidelines on materials, ceilings, lighting or services integration.
Market maturity and local expectations
The office fitout market in Australia is well developed. That means you will find a full spectrum of providers, from design only studios and furniture suppliers through to full service fitout partners who handle concept, documentation, approvals, build and furniture in one package.
There are also clear expectations from building managers and regulators. You will need compliant documentation, insurances, and adherence to Australian Standards and Work Health and Safety requirements. Later sections in this guide go into the planning steps and compliance in more detail so you know exactly what to ask for.
Key Regional Considerations: Melbourne, Sydney And Brisbane
The fundamentals of office fitouts are consistent across Australia, but each major city has its own quirks. Those differences affect planning timeframes, access, cost structure and even layout choices.
Melbourne office fitouts
Melbourne has a competitive fitout and furniture market, with a strong focus on design quality and workplace strategy. In many precincts, tenants expect a high design standard, even for smaller spaces.
Things you will often need to deal with in Melbourne include:
- Complex building access in older CBD towers or heritage structures, which can affect delivery schedules and construction staging.
- Higher focus on flexible work settings, such as activity based working and hybrid layouts, which has a direct impact on how you plan furniture and technology.
- Tight competition for talent, which pushes many businesses to treat the office as a key part of their attraction strategy.
Sydney office fitouts
Sydney tenants often operate in high density towers with strict building rules, detailed access conditions and closely managed services. That means coordination with building management can be just as important as the construction itself.
Common Sydney considerations include:
- Stringent work hours and noise limits for building works in CBD locations.
- Challenging logistics for delivery and waste removal, especially if loading docks and lifts are heavily booked.
- High expectations for client facing areas, particularly in industries that host frequent external meetings.
Brisbane office fitouts
Brisbane combines traditional CBD office towers with growing fringe and suburban business hubs. Climate, building stock and growth patterns all influence fitout choices.
In Brisbane you will often need to think about:
- Thermal comfort and glare management through layout, blinds and furniture placement, due to stronger sun exposure at certain times of the year.
- Mix of corporate and relaxed environments, where businesses might want a professional reception but more casual breakout and collaboration zones.
- Future growth, given the amount of commercial development and changing tenancy patterns across the city.
What You Can Expect From This Guide
This is a practical guide written for Australian office managers and business owners who want clear, direct answers, not vague design talk. Across the next sections you will get detailed breakdowns on:
- Office fitout costs per square metre in Australia, with the typical components that drive your budget.
- Step by step planning process, from briefing and design through to approvals, construction and handover.
- Key office layout types and how to choose between open plan, hybrid and activity based setups.
- Australian ergonomic standards and WHS requirements, with practical checkpoints you can use during design and furniture selection.
- How to choose the right office fitout provider in Australia, using a straightforward selection checklist.
- Specific insights for Melbourne fitouts, including local expectations and market dynamics.
Use this guide as your reference as you move through your project. If you want to explore ready to go furniture options that align with professional Australian fitouts, you can start with Officely’s core ranges of ergonomic office chairs and office furniture solutions that are designed for local workplaces.
How Much Does An Office Fitout Cost In Australia?
When you ask, “How much will this office fitout actually cost per square metre?”, you want a straight answer, not a vague range that could mean anything. The honest truth is that costs move around based on scope, city and building, but you can still use clear bands to plan your budget and pressure test quotes.
I will walk you through three practical cost levels, how they usually look in real projects, and a checklist you can use to make sure every component is accounted for before you sign anything.
Typical Cost Levels Per Square Metre In AUD
Most Australian office fitouts fall into three broad categories when you look at cost per square metre in AUD.
- Basic fitout, lower cost per square metre
This level focuses on function first. You are aiming for a clean, compliant, no nonsense workspace. Expect:- Minimal layout changes to the base building or existing tenancy.
- Standard workstations and office desks, with ergonomic but entry level task chairs.
- Simple meeting rooms created with standard partitions and basic acoustic treatment.
- Standard commercial carpet, paint and simple lighting adjustments.
- Limited custom joinery. For example, a straightforward kitchen bench and a simple reception counter.
- Medium fitout, mid range cost per square metre
This is where many Australian businesses land. You get a workplace that supports modern ways of working and reflects your brand without going into luxury spend. Expect:- More significant reconfiguration of layout and partitions to suit your specific team.
- A mix of workpoints, such as fixed desks, hot desking, quiet rooms and small meeting spaces.
- Improved acoustics with better partition systems, ceiling treatments or acoustic panels.
- Better quality furniture, including ergonomic seating and more durable workstations.
- Feature finishes in key areas, such as reception, breakout and main meeting rooms.
- More involved electrical and data works, including integrated power and AV in meeting rooms.
- Premium fitout, higher cost per square metre
At this level you are investing in design impact, higher specification finishes and a more complex technical setup. Expect:- Strong workplace strategy and bespoke planning tailored to your workflows.
- Extensive custom joinery for reception counters, storage walls, kitchens and collaboration zones.
- High grade finishes such as feature timber, premium floor coverings and tailored lighting design.
- Advanced AV integration, room booking systems and technology rich collaboration spaces.
- Specialised spaces, such as wellness rooms, internal client suites or acoustic pods.
You will see different per square metre figures for Melbourne, Sydney and Brisbane, and those shifts usually track with trades pricing, building access conditions and local design expectations. The important thing is to pick the band that matches your strategy, then use it as a cross check when quotes arrive.
Key Factors That Influence Your Fitout Cost
Two offices with the same floor area can land at very different costs. The gap almost always comes down to a handful of drivers that you can control if you understand them upfront.
1. Level of demolition and construction
The more you pull out and rebuild, the more you pay per square metre. Major cost drivers include:
- Removing existing partitions, flooring, ceilings or joinery instead of reusing them.
- Building a high number of enclosed rooms, especially if they need acoustic performance.
- Complex details, such as curved walls or extensive glazing.
If you want to keep a lid on costs, start by asking what can stay, what can be adapted and what must be rebuilt to meet compliance and operational needs.
2. Services, especially mechanical, electrical and data
Services work often surprises people. Shifting air conditioning, upgrading power capacity, or rewiring and recabling can add a significant portion to your per square metre rate. Pay close attention to:
- How many workpoints and devices need power and data.
- Whether existing mechanical services can support your new layout or need modification.
- Fire services that may need to be moved or reconfigured when you add or remove walls.
A well scoped services package avoids nasty surprises during construction, when access to ceiling cavities is already booked and you are locked into the program.
3. Furniture quality and quantity
Furniture can swing your budget significantly. A simple workstation and chair package will sit at one price point. Height adjustable desks, acoustic screens and premium ergonomic chairs will sit at a different one.
The trick is to match furniture spend to the areas that actually drive performance. For example, it often makes sense to prioritise spend on ergonomic task seating and reliable workstations. You can use more cost effective tables in secondary meeting spaces or short stay touchdown points. If you want to explore price points for desks and chairs, you can cross check against ranges in Officely’s ergonomic office furniture collection.
4. Technology and AV integration
Integrated technology will push your per square metre cost up, but it usually pays you back through better hybrid meetings and less daily friction. Items that influence cost include:
- Room booking systems and occupancy sensors.
- Ceiling speakers, microphones and displays in meeting rooms.
- Custom AV joinery and cable management, especially in boardrooms.
Keep in mind, retrofitting AV after the fitout is complete often costs more than planning it in from day one.
5. City, building and access conditions
The same design can cost more or less per square metre depending on where you build it. Factors that push cost up include:
- Strict work hour windows and loading dock restrictions in CBD towers.
- Old building stock that needs more make safe works or complex services modifications.
- High security or specialist base building requirements.
This is why you should always ask a potential fitout partner to walk the site before committing to a budget. Anything that affects access, deliveries or services will flow through to cost.
Office Fitout Cost Checklist Per Square Metre
To keep control of your spend, you need to know exactly what is included in the per square metre rate a provider quotes. Use this checklist as a framework. Go through it line by line and confirm whether each item is in scope, out of scope, or a provisional allowance.
1. Design and professional fees
- Workplace strategy and briefing sessions.
- Concept design and space planning.
- Detailed documentation, including finishes, joinery and furniture specifications.
- Engineering inputs such as electrical, mechanical or fire design where required.
- Certification costs and building approval documentation.
- Project management and site supervision.
2. Building works and finishes
- Demolition and make safe of existing partitions, ceilings and floor finishes.
- New partitions, doors and frames, including any glazing systems.
- Ceiling works, including new grid, tiles or feature ceilings where specified.
- Floor finishes, such as carpet tiles, vinyl, hybrid flooring or tiles.
- Painting and wall finishes, including any feature walls or acoustic panels.
- Custom joinery, including kitchens, tea points, storage units and reception counters.
3. Services and compliance
- Electrical distribution, including new circuits, power outlets and switchboards where needed.
- Lighting supply and installation, including emergency and exit lighting adjustments.
- Data cabling, patch panels and related hardware.
- Mechanical services adjustments to suit the new layout.
- Fire services modifications, such as sprinklers, smoke detectors and exit signage.
- Security systems, including access control or CCTV if required.
- Compliance inspections and sign offs, aligned with Australian Standards and local regulations.
4. Furniture and workstations
- Workstations and desks (fixed height or height adjustable).
- Task chairs, visitor chairs and meeting room seating.
- Meeting, boardroom and collaboration tables.
- Storage units, such as cabinets, credenzas and shelving.
- Staff lockers for hybrid or hot desking environments.
- Soft seating for breakout areas and reception lounges.
Make sure you know whether installation and delivery are included in the furniture allowances. If they are not, your per square metre cost will increase once you add them.
5. Technology, AV and cabling
- Displays, cameras, microphones and speakers for meeting rooms.
- Interactive screens or whiteboards where specified.
- In desk power modules, power rails and floor ducting for clean cable management.
- Server room or comms rack fitout, including dedicated power and cooling if needed.
Cross check any technology scope against the way your team actually works. For example, a boardroom that hosts [insert number] people regularly will have different AV needs than a small project room that hosts quick internal catch ups.
6. Site costs and contingencies
- After hours work or weekend work if the building does not allow noisy works during business hours.
- Lift and loading dock bookings and any associated fees.
- Waste removal and cleaning throughout the project.
- Allowances for unknowns, such as hidden conditions discovered after demolition.
Never look at the per square metre cost in isolation. Always tie it back to a clear scope, broken into the categories above. That is how you compare quotes fairly and avoid the trap of picking the cheapest number that later explodes with variations.
If you want a partner who can take you from early budgeting through to furniture selection, you can read more about Officely’s approach to professional office fitouts in Australia and use that as a benchmark when you talk to other providers.
What Are The Key Steps In Planning An Office Fitout In Australia?
If you treat your office fitout like a single purchase, it will run you. If you treat it like a staged project with clear gates, you stay in control. The Australian context adds another layer, because you need to align with local building rules, Work Health and Safety requirements and landlord conditions.
Use this step by step process as your roadmap. You can adapt the detail to your project size, but the sequence stays the same.
Step 1: Clarify Your Needs, Constraints And Objectives
Before you talk to designers or builders, get your own brief straight. This sets the guardrails for every decision that follows.
Lock in the basics first.
- Headcount and growth. Current staff numbers, expected growth over [insert timeframe], and how many days people are typically in the office.
- Work patterns. Ratio of focus work to collaboration, typical meeting sizes, storage needs and any specialist tasks or equipment.
- Hybrid and flexible work. Your policies for work from home, hot desking and shared spaces so you can size workpoints properly.
- Budget band. A realistic cost per square metre range and an overall cap that includes fees, build, furniture and tech.
- Timeframe. Lease dates, notice periods for your current space and any hard deadlines, such as a move by [insert date reference].
Capture this in a simple written brief. Do not worry about design language. Focus on what you need the space to do and where you cannot compromise.
Step 2: Review Lease, Base Building Conditions And Landlord Requirements
Your lease and the base building rules in Australia can help or hurt your fitout. Read them early so you are not redesigning later to suit constraints you should have known about.
Key items to confirm with your landlord or building manager include:
- Base building scope. What is already provided in your tenancy, such as ceilings, lighting, mechanical services and fire services.
- Alteration rules. What you are allowed to modify, and any restrictions on penetrations, wet areas, heavy loads or building façade impacts.
- Make good obligations. What you must reinstate at the end of the lease, which affects whether certain works are worth doing.
- Approved contractor requirements. Any obligations to use panel contractors or follow specific induction and insurance processes.
- Access conditions. Construction hours, noise limits, use of lifts and loading docks and any out of hours costs.
Share these documents with any design or fitout partner from day one. It saves you from drawing things that are not buildable in that building.
Step 3: Engage A Design And Workplace Planning Team
Once your internal brief and lease conditions are clear, you bring in design support. This might be a design only practice, a fitout company with in house design or a combined design and project management team.
You are looking for three main deliverables at this stage.
-
- Test fits and space planning. High level layouts that show how your headcount and work settings fit into the floor plate. This is where you check that your tenancy size matches your needs.
- Concept design Early visuals and finishes direction so you can see how brand, colour and material choices play out.
- Preliminary services review. An initial check on mechanical, electrical and fire impacts, preferably with input from services consultants who know Australian standards.
Ask for a clear planning program at this point, with dates for concept sign off, design development, documentation, approvals and construction. You want the whole path on one page so you can map it against lease dates.
Step 4: Set A Working Budget And Value Priorities
With a rough layout and concept in place, you can convert ideas into a working budget. Treat this as a living document that you refine as design develops.
Break the budget into clear cost buckets.
- Base build adjustments. Items required to bring the existing space up to a workable condition.
- Fitout construction. Partitions, doors, ceilings, finishes and joinery.
- Services. Electrical, lighting, data, mechanical and fire modifications.
- Furniture and loose items. Workstations, seating, lockers, storage and soft seating. You can cross check pricing here against ranges in Australian office furniture solutions.
- Technology and AV. Meeting room tech, power rails, floor ducting and any specialist rooms.
- Professional fees. Design, engineering, certifier and project management.
- Contingency. A buffer for unknown conditions or client driven changes.
Decide where you will spend more and where you will hold. For example, many Australian businesses choose to prioritise ergonomic workstations, reliable meeting technology and acoustic treatment before high cost finishes in back of house areas.
Step 5: Develop Detailed Design And Documentation
Once the budget and direction are aligned, the design team moves into detailed design and documentation. This is what builders price and what regulators review.
Expect a drawing and specification set that covers at least the following.
- Dimensioned floor plans that show walls, doors, workpoints and clearances.
- Reflected ceiling plans showing lighting layout, ceiling types and any bulkheads.
- Finishes schedules that list flooring, wall finishes, joinery finishes and hardware.
- Joinery details for kitchens, reception counters, storage and custom elements.
- Services drawings for power, data, mechanical and fire systems, often prepared with or by engineers who work to relevant Australian Standards.
- Furniture layouts and schedules listing quantities and specifications.
This is also where ergonomic and Work Health and Safety considerations get baked in, for example, clearances between desks, circulation widths, workstation sizing and monitor arm provisions. You will see more on specific ergonomic requirements in a later section of this guide.
Step 6: Confirm Regulatory And Compliance Pathway
Every Australian office fitout needs to comply with a mix of requirements, including the National Construction Code, relevant Australian Standards, Work Health and Safety legislation and local council or building certifier processes.
Work with your designer or project manager to map out the approvals pathway. Typical items include:
- Building management consent. Most commercial buildings in Australia require you to submit drawings, specifications and contractor insurances for review.
- Building approval or certification. For many fitouts, a private certifier or building surveyor reviews the design against building code requirements.
- Fire engineering and sign off. Any changes that affect exits, fire compartments or sprinkler layouts usually need specialist input.
- WHS and Safe Work method documentation. Your contractors must have safe work plans that align with state and territory WHS laws.
- Accessibility compliance review. Layouts, door widths, ramps and amenities must align with relevant access standards and disability discrimination requirements.
The critical milestone here is documented approval to proceed with construction. Do not start demolition or major works without it, or you risk delays and rework.
Step 7: Tender, Compare And Select Your Fitout Partner
With full documentation in hand, you can approach the market for pricing. You might run a formal tender with multiple builders, or negotiate with a single design and construct partner.
To keep comparisons clean, use a structured approach.
- Issue the same documents to all parties, including drawings, specifications, fixture lists and landlord requirements.
- Provide a pricing template that breaks costs into the same categories you used in your budget, such as construction, services, furniture and preliminaries.
- Ask for a program with start and completion dates, including lead times for long supply items such as custom joinery or imported furniture.
- Request clarifications on exclusions, provisional sums and assumptions so you know exactly what each quote covers.
When you review responses, avoid choosing purely on lowest price. Weigh contractor experience with Australian commercial fitouts, quality of proposed program, communication style and ability to coordinate approvals. For a feel of what a full service partner looks like, you can review the scope on professional office fitout services in Australia.
Step 8: Pre Construction Coordination And Site Readiness
Once you have a preferred builder or fitout partner, there is a short but important phase before construction starts on site.
Key tasks include:
- Contract agreement. Formalise scope, price, program and variation processes.
- Final services coordination. Confirm all mechanical, electrical, data and fire details with the base building team and any independent engineers.
- Lead time confirmation. Order long lead items early so they land in line with the construction program.
- Site logistics plan. Agree with building management on access, waste removal, noisy work windows and protection of common areas.
- Safety and induction. Ensure all contractors meet building and WHS safety requirements.
The milestone here is a clear, agreed start date on site with approvals and documentation in place.
Step 9: Construction, Quality Checks And Variations Control
During construction, your role shifts from design decisions to oversight. You do not need to manage trades directly if you have a competent fitout partner, but you do need structured check points.
Put these routines in place.
- Regular site meetings with agendas that cover progress against program, upcoming milestones and any issues.
- Quality inspections at key stages, such as framing, services rough in, pre paint and post installation of joinery and furniture.
- Variation management, with written quotes and approvals before extra work proceeds.
- Communication with staff about noise, access or short term disruptions if you are building in a live environment.
Track emerging risks early. For example, if a services clash is identified in the ceiling, resolve it on drawings before it stalls multiple trades on site.
Step 10: Practical Completion, Handover And Defects
The last stage is where you take possession of the new office. If you handle it properly, you reduce headaches in the first months of operation.
At practical completion, work through a formal process.
- Inspection and defects list. Walk the space with your fitout partner and list items that are incomplete or need rectification.
- Compliance documentation. Collect certificates from the builder, engineers, fire contractors, electrical contractors and certifier to show the fitout complies with Australian standards and building approvals.
- As built drawings and manuals. Make sure you have updated drawings, equipment manuals and maintenance instructions.
- Training and onboarding. Have your team shown how to use any new systems, such as AV, room booking, height adjustable desks or building access control.
Most contracts will include a defects liability period. During this time, your builder is responsible for fixing items that appear, such as minor cracking or adjustment of doors and hardware. Keep a simple log of issues and send them through in agreed batches for rectification.
The project is not finished when you move in. It is finished when the space works the way you intended and the paperwork backs it up.
If you follow these steps in order, you reduce the guesswork and keep your Australian office fitout on time, on budget and compliant, with far less stress on you and your team.
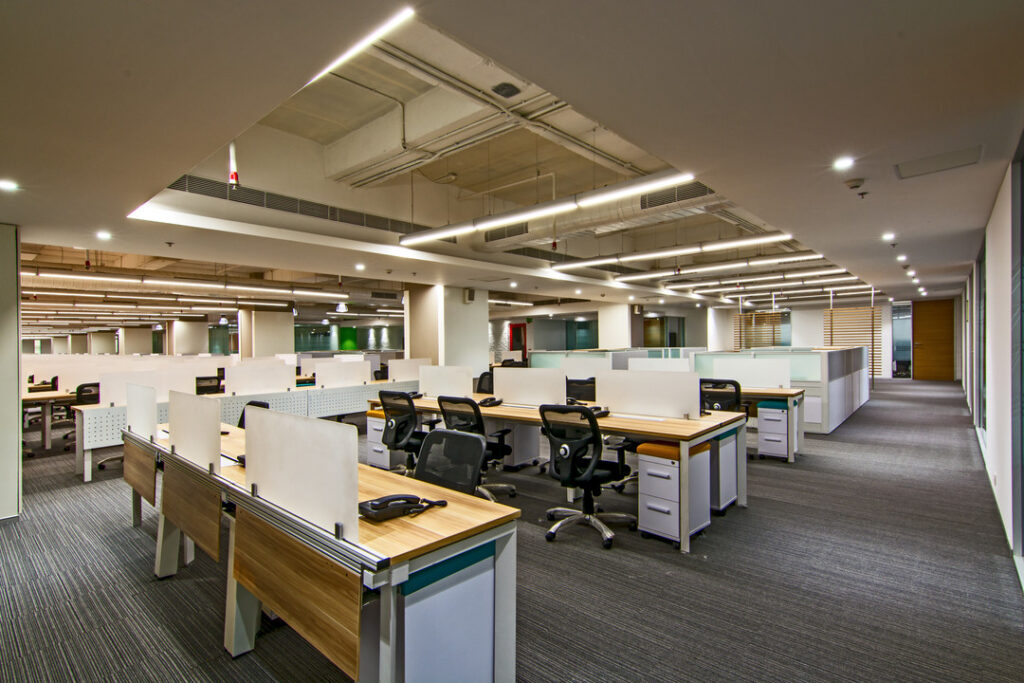
Which Office Layout Type Is Right For Your Business?
The layout choice will shape how your people work more than any single piece of furniture. In Australia, with hybrid work now normal and office days carrying more weight, you cannot afford to guess this part.
You will see three main layout models in current Australian workplaces, open plan, hybrid and activity based working. The best fit for you depends on your headcount, industry, work style and how often people are actually in the office.
What Is An Open Plan Office Layout?
In an open plan layout, most people sit in shared open areas with limited enclosed offices. Workstations cluster into banks or rows, meeting rooms sit around the edges and there are usually a few breakout spots.
Typical fit in Australia
- Small to mid size teams that want everyone in sight.
- Teams that communicate heavily across the day, such as operations or customer support.
- Workplaces that have simple role structures and minimal confidentiality needs.
Advantages of open plan
- Efficient use of space. Open plan layouts can fit more people into a given floor area, which helps if rent pressure is high in CBD locations.
- Simple to plan and reconfigure. You can move desks, add a workstation run or adjust seating without large construction works.
- Fast communication. People can ask quick questions across a pod instead of booking meetings.
- Clear visibility for managers. Team leaders can see what is happening and support staff in real time.
Challenges of open plan
- Noise and distraction. Phone calls, video meetings and informal chats can quickly overpower the space if you do not manage them.
- Limited privacy. Sensitive conversations about HR, finance or client matters are harder to handle discreetly.
- One size fits no one. People doing focus work and people doing constant calls often clash in the same zone.
How to make open plan work in an Australian context
If you lean toward open plan, treat acoustics and zoning as non negotiable. Use a simple checklist when you review your layout.
- Separate focus zones from high chatter teams, such as sales, with distance, screens or acoustic panels.
- Provide enough enclosed focus rooms for [insert number] of people who need quiet work blocks or private calls.
- Plan proper collaboration tables and stand up zones so people are not holding 30 minute huddles over someone else’s screen.
- Use workstation screens and sound absorbing finishes where possible to soften sound levels.
Pair your layout choices with furniture that supports this, for example, open plan runs of workstations with privacy screens and reliable ergonomic chairs. You can get a sense of typical workstation setups by reviewing ranges such as double sided workstations with screens or mesh ergonomic task chairs.
What Is A Hybrid Office Layout?
A hybrid layout blends open work areas with more enclosed rooms and flexible settings. It recognises that not everyone is in the office every day, and that days in the office usually focus on collaboration, workshops and key meetings.
Typical fit in Australia
- Businesses with clear hybrid work policies, for example, [insert number] days in office per week.
- Professional services, tech, creative and project based teams.
- Organisations that host clients on site but do not need dedicated offices for every senior person.
Advantages of hybrid layouts
- Supports multiple work modes. You can create a realistic mix of focus desks, team spaces and enclosed rooms.
- Matches hybrid occupancy. You do not need a dedicated desk for every employee if you design for hot desking in some zones.
- Better privacy options. Private rooms handle HR meetings, performance reviews and sensitive client calls without noise spill.
- Stronger client experience. You can create a defined client suite with consistent presentation and technology.
Challenges of hybrid layouts
- More complex planning. You need to think through bookings for desks and rooms, not just allocate permanent seats.
- Risk of underused space. If your hybrid policy is loose, you can end up with lots of empty desks on some days and a scramble for seats on others.
- Change management. People used to assigned desks may resist hot desking or shared storage.
How to design a practical hybrid layout
Start by mapping your occupancy across a typical week, then size your work settings around that instead of your full headcount. Use this as a framework.
- Define your primary workpoints. Decide how many fixed desks, hot desks and touchdown benches you need at peak occupancy.
- Layer in collaboration settings. Plan for different meeting sizes, for example, [insert number] person huddle rooms, [insert number] person project rooms and larger boardrooms.
- Provide focus and quiet rooms. Design small enclosed rooms for calls and online meetings so people do not need to hog meeting rooms for single person calls.
- Plan for storage and lockers. In hybrid offices, personal storage moves from the workstation to lockers and shared cupboards. This keeps hot desking areas clear.
Hybrid layouts suit Australian teams that jump between desk work, video meetings and in person catch ups in the same day. They also line up well with Work Health and Safety expectations, because you can provide ergonomic desks for regular users and alternative settings for shorter use periods, such as high bar collaboration tables and soft seating.
What Is Activity Based Working (ABW)?
Activity based working goes a step further than hybrid. Instead of assigning people to a desk or even a fixed zone, you design a variety of settings and ask people to choose where they work based on the task they are doing that hour.
Typical fit in Australia
- Larger organisations with diverse work types and teams.
- Businesses that want to compress desk numbers and invest more in shared spaces.
- Teams that are comfortable with high levels of movement and shared ownership of the office.
Advantages of activity based working
- Strong space efficiency. You can significantly reduce one person per desk ratios and free up area for collaboration, project spaces and social zones.
- Choice and autonomy. Staff can pick quiet focus booths, collaboration tables, lounges or formal desks depending on what they need to get done.
- Supports dynamic project work. Cross functional teams can form around specific project spaces without being bound by fixed seating plans.
Challenges of activity based working
- High change impact. Moving from assigned desks to full ABW requires a major mindset shift and strong internal communication.
- Behavioural rules are vital. Without clear protocols on clean desk habits, noise and bookings, ABW environments can feel chaotic.
- Not ideal for all roles. Some roles need stable setups, specialist equipment or secure storage that do not suit daily movement.
Design principles for ABW in Australia
If you are considering ABW, avoid copying a glossy layout. Use a structured approach.
- List your main work activities, for example, focus writing, data processing, phone based support, creative workshops, client presentations and virtual collaboration.
- For each activity, define the setting type it needs, such as quiet desk, acoustic booth, project table, lounge setting or formal meeting room.
- Decide how many of each setting you need based on peak simultaneous use, not total staff numbers.
- Specify ergonomic and WHS requirements for each setting, including seat support, desk height, lighting and technology access.
ABW can suit Australian businesses that want to treat the office as a hub for collaboration and culture, rather than a default daily workstation farm. It works best where leadership is ready to model the behaviour, for example, giving up private offices and using the same shared settings as everyone else.
How To Match Layout To Your Business Size And Industry
Instead of asking, “Which layout is best?”, ask, “Which layout matches our real work patterns and culture?”. Use this decision framework as a guide.
1. Start with work style, not trends
Answer these questions honestly.
- Do most people spend their day on calls, deep focus work, or constant collaboration?
- How much of your work is confidential or sensitive?
- How often do you host clients on site and what impression do you need to create?
- Are teams structured around long term functions or rotating projects?
If focus work dominates and confidentiality is high, lean closer to hybrid with more enclosed rooms. If collaboration and project work dominate, hybrid with strong shared spaces or ABW can work well.
2. Align with your Australian workplace culture
Australian teams tend to value approachability and low hierarchy, but that plays out differently by industry.
- Professional and financial services often mix open plan team areas with enclosed client suites and a small number of private offices.
- Tech, digital and creative teams tend to accept hot desking, lounges and informal collaboration zones more readily.
- Government and compliance heavy environments usually need stronger control over storage, privacy and secure zones.
Ask yourself where your leadership style sits on that spectrum. If your senior team still needs doors for focus and confidentiality, design that explicitly and support it, instead of forcing everyone into open plan for appearance.
3. Consider your size and growth plans
For smaller teams, pure open plan with a handful of enclosed rooms can be completely workable. As you grow, noise and meeting demand climb quickly, and hybrid layouts usually become more practical.
Use this simple rule of thumb. The more people and work types you have, the more variety of settings you need. That naturally pushes you toward hybrid or ABW rather than a single mode open space.
A Simple Checklist To Choose Your Office Layout Type
Use this checklist with your leadership group before you lock in a layout.
- Clarify occupancy. Peak in office numbers per day, by team and location.
- Rate your work types. Percentage split of focus work, collaborative work and client facing work across a typical week.
- Map confidentiality needs. Identify roles and tasks that must happen in enclosed rooms.
- Decide desk strategy. Assigned desks for all, assigned desks for some roles, or a mix of hot desking and touchdown points.
- List required settings. Desks, quiet rooms, huddle spaces, project rooms, boardrooms, training rooms, lounges and focus booths.
- Check against culture. Confirm that the chosen layout supports the way you lead and how you want people to interact, rather than fighting it.
Once you have those answers, the right layout type usually becomes obvious. Open plan suits simple team structures and smaller spaces. Hybrid suits most contemporary Australian workplaces. ABW suits larger, more fluid organisations that are ready to commit to genuine behaviour change, not just a new floor plan.
Understanding Australian Ergonomic Standards And Requirements
If you want your new office to work long term, you cannot treat ergonomics as an afterthought. In Australia, ergonomic design ties directly into Work Health and Safety (WHS) duties. Poor workstation setups, bad seating and awkward layouts do not just annoy staff, they increase the risk of musculoskeletal issues and can expose you to WHS claims and higher absence.
Let us unpack what ergonomics actually means in an Australian office, which standards and regulations come into play, and how to make practical choices on chairs, desks and layouts that keep you compliant and keep people comfortable.
What Does Ergonomics Mean In An Australian Office Fitout?
In simple terms, ergonomics is about fitting the work to the person, not the other way round. For office fitouts, that covers:
- Workstations, including desk height, leg room and space for screens, keyboards and documents.
- Seating, especially lumbar support, adjustability and seat depth.
- Task layout, where you place monitors, phones, storage and frequently used items.
- Environment, such as lighting, noise, temperature and glare control.
- Movement, how easily people can change posture, stand, walk and use different settings through the day.
Good ergonomics in your fitout reduces physical strain, fatigue and repetitive movements. It also makes it much easier for you to satisfy WHS obligations, because you can show that the physical workspace supports safe work practices.
Key Australian Regulations And Standards That Influence Ergonomics
You do not need to memorise every clause of each standard, but you do need to know the main buckets of responsibility so you can brief your designers and suppliers properly.
1. Work Health And Safety (WHS) Legislation
Across Australian states and territories, WHS laws require you to provide a work environment that is safe as far as reasonably practicable. For office fitouts, that includes:
- Identifying hazards related to workstation design, seating, manual handling and repetitive tasks.
- Assessing risks, for example, prolonged sitting, awkward postures, or poorly placed screens and keyboards.
- Controlling those risks through design, furniture selection, equipment and work practices.
- Consulting with workers about changes that affect their health and safety, such as new desk systems or layout changes.
Ergonomic issues are treated as WHS issues, not nice to have comfort upgrades. When you plan your office, factor ergonomic design into your WHS risk assessments, not as a separate side project.
2. Australian Standards For Workstations And Seating
Several Australian Standards give guidance on dimensions, adjustability and performance for office furniture and work environments. These standards cover topics such as:
- Design and dimensions of workstations and desks, including clearance zones.
- Adjustability and performance criteria for office chairs.
- Lighting levels, glare control and visual comfort for screen based work.
- General ergonomic principles for computer workstations.
Your goal is not to become an expert in every clause. Your goal is to make sure that:
- Your design team understands which ergonomic related standards they must consider.
- Your furniture supplier can confirm that key items, such as task chairs and workstations, are designed in line with relevant Australian requirements.
- Your fitout partner includes ergonomic considerations in layouts, clearances and room sizing, not just in furniture brochures.
3. Codes And Guidelines For Screen Based Work
Most office roles involve long hours on computers. Australian guidance around screen based work focuses on:
- Screen height and distance to reduce neck and eye strain.
- Keyboard and mouse positioning to minimise awkward wrist angles.
- Desk surface size to support documents, equipment and comfortable arm support.
- Encouraging regular micro breaks, posture variation and movement.
When you design your fitout, treat any regular computer user as someone who needs a compliant, ergonomic workstation. That includes shared hot desks used regularly across the week, not just permanently assigned desks.
Practical Ergonomic Requirements For Desks And Workstations
On paper, ergonomic standards can feel abstract. In a fitout, they translate into clear design and specification choices.
Desk Height, Size And Clearance
Use this framework when you review desk specifications and layouts:
- Height: Choose desk systems that either sit in the common standard height band or provide height adjustability within a recommended ergonomic range. Height adjustable desks, including manual options, make it easier to accommodate different user heights. You can see how this works in practice in products such as manual systems on height adjustable desks for Australian offices.
- Leg room: Ensure clear space under the desk for knees and feet, without bulky cabinets blocking natural sitting positions.
- Depth: Select tops deep enough to allow correct monitor distance, keyboard placement and forearm support.
- Width: Provide enough width for screens, documents and occasional lateral movement, even at hot desks.
In shared or hot desking environments, standardise on a desk size that suits the largest portion of your workforce, then rely on chair and monitor arm adjustments to fine tune individual setups.
Monitor Positioning And Accessories
Monitor setup has a bigger impact on neck and shoulder comfort than many people realise. Work these requirements into your design:
- Height: The top of the screen should sit around eye level for the user. This is hard to achieve with fixed stands, so plan for monitor arms or risers, especially at permanent desks.
- Distance: Screens should sit at a comfortable viewing distance, which usually means they are not jammed hard against a desk mounted screen or wall.
- Multiple monitors: Plan for dual arm setups where roles rely heavily on side by side programs or documents.
- Cable management: Use power and data solutions that let you position monitors correctly without stretching leads across the desk. Products such as dedicated power rails and cable baskets, for example workstation power ducting, support this.
Document these requirements in your workstation and IT standards so they are not forgotten when hardware is installed.
Practical Ergonomic Requirements For Office Chairs
If you get only one ergonomic choice right, make it the task chair. Staff spend long hours in them, and poor seating tolerance shows up very quickly in comfort complaints and WHS conversations.
Chair Adjustability Checklist
When you select task chairs for Australian offices, look for models that offer at least the following adjustments:
- Seat height, so feet can rest flat on the floor and knees stay comfortably bent.
- Seat depth, so shorter and taller users can sit back against the backrest without pressure behind the knees.
- Backrest height and lumbar support, to match the curve of the lower back and provide consistent support.
- Tilt mechanism, which allows slight movement and recline instead of locking the body into one fixed position.
- Armrests that can be adjusted or removed where they interfere with desk access.
Ask suppliers clear questions about compliance with Australian ergonomic guidelines and the weight ranges their chairs are designed to support. If you want a benchmark of chairs designed around these needs, review products in ranges such as ergonomic chair collections for Australian offices.
Matching Chairs To Usage Patterns
Not every chair in the office needs the same specification. Use this simple allocation framework:
- Primary task chairs for people who sit for long stretches need full ergonomic adjustability.
- Meeting chairs can be slightly simpler but still require reasonable comfort and support for sessions of [insert duration].
- Breakout, lounge and bar stools can prioritise posture variation and short stay comfort, not full adjustability.
The key point is that any seat used for long, regular desk work should meet a higher ergonomic bar than casual or short stay seating.
Ergonomics In Layout, Circulation And Shared Spaces
Ergonomics is not only about individual workpoints. The overall layout also influences posture, movement and strain.
Clearances And Circulation
In Australian fitouts, you need to think about:
- Space behind desks, so people can push back from their chair, stand and walk without bumping into other users or walls.
- Circulation routes, wide enough to allow people to move comfortably with bags, documents and mobility aids where required.
- Meeting room layouts, that allow people to enter, sit and exit without twisting around chairs or squeezing through tight gaps.
Work with your designer to check dimensioned plans against ergonomic comfort, not just code minimums. Code compliance is your floor, not your target.
Noise, Light And Thermal Comfort
Physical comfort is also affected by the environment around the desk. Integrate the following into your fitout brief:
- Lighting: Aim for consistent, glare free light across screens and work surfaces. Avoid placing screens directly in front of bright windows without blinds.
- Acoustics: Use screens, acoustic panels and soft finishes in open areas to limit fatigue from constant noise.
- Temperature and air flow: Coordinate with mechanical designers so workstations are not located in direct draughts or hot spots.
These elements often sit in separate consultant reports, but for your staff they combine into one experience. Treat them as part of ergonomic planning, not separate technical topics.
How Ergonomics Connects To WHS Processes
To stay compliant through and after your fitout, you need basic WHS processes around ergonomics, not just good products.
Ergonomic Risk Assessment During Design
During concept and detailed design, ask your fitout partner or WHS advisor to complete a simple ergonomic risk review that covers:
- Workstation types and locations for all major roles.
- Desk and chair specifications against ergonomic criteria.
- Placement of high use equipment, such as printers and storage, to avoid awkward lifting and twisting.
- Access for workers who may require adjustments or assistive devices.
Document the controls you have chosen, for example, adjustable chairs, monitor arms, sit stand desks or task lighting, and store that with your WHS records.
Workstation Setup And Staff Training
Even the best ergonomic furniture fails if people do not know how to use it. Build these steps into your move in plan:
- Provide simple workstation setup guides, with diagrams for chair height, seat depth, monitor height and keyboard placement.
- Run short induction sessions or videos showing how to adjust chairs and sit stand desks.
- Encourage staff to vary posture across the day, including standing, stretching and walking to other zones.
- Give staff a clear pathway to request adjustments or raise discomfort, for example, through HR or WHS reps.
This training is part of discharging your WHS duty to provide information, training and instruction for safe work.
A Practical Ergonomics Checklist For Your Australian Office Fitout
Use this checklist during design reviews and furniture selection meetings so ergonomics never falls through the cracks.
- Desks and workstations
-
- <li[>Desk sizes meet your minimum depth and width requirements for screen based work.
- Workstations provide enough leg room and are free from fixed obstructions.
- Height adjustable options are planned for roles with higher risk or longer sitting hours.
</li[>
-
- Seating
- Primary task chairs offer seat height, depth, backrest and tilt adjustment.
- Chair models are matched to usage patterns and expected sitting durations.
- Supplier confirms alignment with relevant ergonomic guidelines for office seating.
- Monitors and accessories
- Monitor arms or risers are specified for regular workstation users.
- Cable management and power access allow correct monitor and keyboard positioning.
- Keyboard and mouse can sit flat, with forearm support on the desk.
- Layout and environment
- Clearances behind desks and in aisles support comfortable movement.
- Lighting design considers screen placement and potential glare.
- Acoustic treatments support concentration in focus zones.
- WHS and training
- Ergonomic risks are identified and recorded as part of WHS planning.
- Controls, such as adjustable furniture and equipment, are documented.
- Staff receive workstation setup guidance and know how to request changes.
Ergonomics is not a luxury add on. It is part of running a compliant, professional Australian workplace. If you bake these requirements into your fitout scope and furniture selections from day one, you reduce risk, improve comfort and make it much easier to show that you have taken WHS duties seriously.
How To Choose The Right Office Fitout Provider In Australia
Choosing your fitout provider will have more impact on your project than any single product choice. A good partner keeps you on budget, on program and compliant with Australian standards. A weak one leaves you managing variations, chasing updates and explaining delays to your leadership team.
Use the criteria and checklists below to assess providers in a structured way. Treat it like hiring a senior leader. You are trusting them with a large spend, your brand image and your staff’s day to day environment.
1. Check Core Credentials And Business Stability
Start with basic health checks before you get carried away with concepts and glossy presentations.
- Licences and registrations. Confirm they hold the right building and trade licences for the state or territory where your office is located.
- Insurances. Ask for certificates of currency for public liability, professional indemnity (if they provide design) and workers compensation.
- Corporate structure and track record. Look for providers with an established presence in Australian commercial fitouts, not businesses that mainly do residential or ad hoc projects.
- Financial stability. You do not need their full accounts, but you should feel confident they will still be trading at project completion. Your procurement or finance team can run basic checks here.
If a provider cannot supply clean, current documentation at this stage, treat it as a red flag. You are about to give them responsibility for compliance on your site.
2. Confirm Experience With Australian Commercial Fitouts
Commercial office work is very different to a one off retail fitout or domestic renovation. You need a team that understands how Australian office buildings operate and how WHS and building code requirements shape the design and construction process.
Use this framework when you review their capability.
- Sector mix. Ask what proportion of their work is commercial office fitouts in Australia as opposed to other sectors.
- Scale. Check that they have delivered projects in a similar size and complexity band to yours. That applies whether you are fitting out a compact tenancy or a full floor.
- Environment type. Confirm they have delivered in both vacant tenancies and live environments where staff remain in place. Live environments demand more planning and care.
- City familiarity. If you are in Melbourne, Sydney or Brisbane, ask directly about their experience with local building managers and typical access rules.
Pay attention to how specific they are. Generic answers usually mean limited real experience with the kind of tenancy you are dealing with.
3. Assess Design Capability And Understanding Of Your Brief
Even if you already have a designer, your fitout partner needs to engage deeply with the design intent. If they provide design in house, you need to be sure that team is competent and understands Australian workplace expectations.
When you meet them, test for the following.
- Ability to restate your brief. Ask them to play back your goals, constraints and must haves. If they cannot summarise it clearly, they have not really heard you.
- Space planning skills. Review how they approach headcount, work settings, meeting room ratios and circulation. You want logic, not just pretty visuals.
- Knowledge of Australian ergonomic and WHS requirements. See if they mention ergonomic furniture standards, safe clearances, and how they manage risks related to screen based work. If they are vague, that risk will land on you later.
- Integration of services. A good designer understands that mechanical, electrical and fire services must align with the layout. They should refer to coordination with engineers and building managers, not design in isolation.
You do not need a design lecture. You need a provider that can explain design decisions in practical terms, such as how a layout will support hybrid work or reduce noise issues.
4. Evaluate Project Management And Site Delivery Capability
On paper, most companies can design and build. Where projects succeed or fail in Australia is usually in project management, coordination and communication with building managers.
Ask direct questions about how they run projects.
- Dedicated project manager. Confirm who will be your single point of contact, how many projects they typically run at once and whether they are based locally.
- Program structure. Request a sample program for a project similar to yours, including milestones for design sign off, approvals, procurement, construction and handover.
- Site supervision. Clarify how often a site supervisor is present, and how they manage trades in live environments or tight CBD buildings.
- Risk and issue management. Ask how they handle late variations, hidden conditions and clashes with base building services. You want a calm, process based answer, not “we just sort it out on site”.
Good project managers talk in specifics about coordination, building rules and safety. Weak ones lean on enthusiasm instead of structure.
5. Test Their Communication Style
You will be working with this team for [insert timeframe]. If communication is poor, you will spend that period chasing updates and dealing with surprises.
Observe their default behaviours during the sales and proposal phase.
- Responsiveness. Do they respond to emails and calls within agreed timeframes or do you have to keep prompting them.
- Clarity. Are their proposals, drawings and emails clear and free of jargon, or do they hide behind vague language.
- Transparency about limitations. Good providers will tell you what they do not know yet and what is still subject to building approval or site inspection.
- Meeting discipline. Do they show up on time, follow an agenda and send notes, or is everything informal and verbal.
Communication patterns rarely improve after contract award. If you are frustrated before you sign, it will only get worse once the project begins.
6. Check Local Supplier And Trade Networks
In Australian fitouts, strong local supply and trade relationships make a big difference to lead times, pricing and problem solving when something changes.
Probe into their network.
- Preferred trades. Ask how long they have been working with their core electrical, mechanical, joinery and partitioning partners.
- Furniture sources. Confirm whether they supply from local or imported ranges and how they manage lead times, warranties and replacements.
- Technical partners. Check who they use for AV, data and specialist services, and whether those partners are familiar with Australian commercial buildings.
- Capacity in your city. If they operate nationally, confirm they have enough resources based in or regularly working in your city.
If you want to get a feel for what a mature local supply network looks like, you can review how a specialist provider like Officely handles national delivery and specification support for office furniture through resources on office furniture for Australian offices.
7. Verify Adherence To Australian Standards And Compliance Processes
Your fitout must comply with the National Construction Code, relevant Australian Standards, WHS legislation and building specific requirements. Your provider should treat compliance as a standard part of delivery, not a box tick at the end.
Ask them to walk you through their compliance pathway.
- Design review. How do they check layouts and specifications against Australian Standards related to fire safety, accessibility and ergonomics.
- Certifier engagement. Do they coordinate directly with a private certifier or building surveyor, or do they expect you to manage that relationship.
- Documentation. What set of certificates and as built documents you will receive at handover, such as fire, electrical and mechanical sign offs.
- WHS management. How they ensure Safe Work Method Statements, site inductions and incident reporting align with state or territory WHS rules.
Ask them to show sample close out documentation from a previous project, with any confidential details redacted. It will give you a clear sense of their rigour.
8. Use A Structured Fitout Provider Selection Checklist
To avoid being swayed only by price or personality, rate each shortlisted provider against the same checklist. You can use a simple scoring matrix, for example from 1 to [insert number] for each item.
- Credentials and stability
- All required licences and insurances verified.
- Clear history in Australian commercial fitouts.
- Comfortable level of business stability.
- Relevant experience
- Proven experience at similar size and complexity.
- Direct experience in your city or building type.
- Familiarity with hybrid, open plan or ABW layouts as needed.
- Design and technical capability
- Strong space planning skills and understanding of your brief.
- Integration of services, ergonomics and WHS considerations.
- Ability to explain design decisions in practical terms.
- Project management and delivery
- Dedicated project manager with clear capacity.
- Logical program with key milestones and dependencies.
- Defined approach to variation control and risk management.
- Communication and culture fit
- Responsive and clear during tender phase.
- Open about constraints and approvals.
- Aligned with how your internal teams prefer to work.
- Local networks and supply
- Established local trades and technical partners.
- Reliable furniture and equipment supply lines.
- Ability to support post completion tweaks and additions.
- Compliance and documentation
- Clear pathway for building approvals and certifications.
- Standard suite of handover documents and as built drawings.
- Structured WHS management and reporting.
- Price and value
- Transparent breakdown of costs with minimal provisional sums.
- Scope clearly matches your brief, not a generic template.
- Balanced view of upfront cost versus whole of life value.
Once you score each provider, you will usually see one or two that stand out on overall fit, not just on headline price.
9. Common Pitfalls To Avoid When Selecting A Fitout Partner
Plenty of problems in Australian office projects start at provider selection. Here are the traps to sidestep.
- Choosing on price only. The cheapest quote often relies on thin scopes, optimistic allowances or lowballing services and compliance costs. Those come back as variations.
- Vague scopes. If the proposal is full of “to be confirmed” or “by others”, you are buying risk. Push for clear inclusions and exclusions.
- Unproven local presence. Providers who are new to your city or do not know your building type will need a learning curve. You pay for that in time and friction.
- No reference framework. If you do not have your own benchmark, it is easy to be impressed by the first confident pitch. Ground yourself by reviewing structured service outlines from specialists that focus on Australian offices, for instance the way Officely presents integrated support for fitouts and furniture on its services overview.
- Skipping a site walk with each tenderer. If bidders have not walked the tenancy, their price is a guess. Insist on a site visit before they finalise pricing.
A good fitout provider is a partner, not just a contractor. When you take the time to assess credentials, experience, communication and compliance in a structured way, you dramatically reduce project risk and give yourself a team you can rely on through design, build and beyond move in.
Regulatory Compliance And Sustainability Considerations For Australian Office Fitouts
If you ignore compliance and sustainability at briefing stage, you pay for it later in redesigns, delays and higher running costs. In Australia, building codes, fire and safety rules, accessibility requirements and environmental expectations all shape what you can build and how you should build it.
This section gives you a practical view of what you need to cover, from building approvals to disability access to sustainable materials and energy efficient design. Use it as a checklist with your designer, fitout partner and landlord before you lock in plans.
Which Australian Building Codes And Regulations Affect Office Fitouts?
Your office fitout must sit inside a clear regulatory framework. You do not need to be the technical expert, but you do need to recognise the main categories so you can ask the right questions.
1. National Construction Code (NCC)
The NCC sets minimum standards for how buildings in Australia are designed and constructed. For a typical office fitout, the NCC influences:
- Fire safety, including exits, travel distances, fire compartments, fire doors and fire resistant construction where required.
- Structural performance, when you add significant new loads or structural elements.
- Health and amenity, such as ventilation, natural light requirements, sanitary facilities and minimum room heights.
- Energy efficiency, especially if your works trigger upgrades to services or building fabric.
Your designer or certifier will usually classify your tenancy and confirm which parts of the NCC apply. Your job is to insist that compliance is checked during design, not left to the certifier to fix under time pressure later.
2. Australian Standards
Many NCC clauses reference specific Australian Standards. Others apply through WHS or building management requirements. Common standards that influence office fitouts cover topics such as:
- Fire detection, alarm systems and emergency lighting.
- Access for people with disability, including paths of travel, ramps, handrails and sanitary facilities.
- Electrical installations and safety.
- Acoustic performance in certain situations.
- Ergonomics for workstation and seating design, which we covered in an earlier section.
You do not need to quote standard numbers. You do need to ask your design and construction team which standards they are working to, and to make sure those are listed clearly in their documentation.
3. State And Territory Work Health And Safety (WHS) Laws
WHS legislation sits over everything you do. As a person conducting a business or undertaking, you have a duty to provide a workplace that is safe, so far as reasonably practicable. For fitouts, that plays out in two phases.
- During construction, your contractors must manage construction risks, such as working at height, hot works, live services, manual handling and site access.
- After occupation, your layout, furniture and building services must support safe daily work, for example, safe access and egress, ergonomic workstations, safe manual handling around storage and equipment.
In practice, this means you should integrate WHS risk assessment into design reviews. Do not just sign off on the look. Ask where WHS risks have been identified and how the design reduces or manages those risks.
4. Local Council And Building Management Requirements
Even if a private certifier handles formal approval, local councils and building managers still influence what you can do.
- Local councils may be involved if your works change building use, impact the façade or affect services that have a public interface.
- Building management will almost always require a formal approval of your drawings, method statements, insurances and contractor details before onsite work starts.
Each building has its own fitout guide, rules for noisy works, access and protection of common areas. Get these in writing early and give them straight to your design and construction team.
What Fire And Life Safety Requirements Apply To Office Fitouts?
Fire safety is not negotiable. It affects layout, materials and services. If you get it wrong, certifiers and building managers will stop your project until it is fixed.
Key Fire Safety Elements To Address
- Exits and egress paths. Your layout cannot reduce the number or width of exits below required levels, and it cannot create dead ends beyond permitted lengths. Furniture, storage and joinery must not obstruct exit paths.
- Fire resistant construction. Walls that form fire compartments, stairs or separation between tenancies often need specific fire ratings. If you alter or penetrate these, you must reinstate the required performance.
- Fire doors. Fire doors must remain self closing and unobstructed. Hardware changes or door stops that interfere with performance can fail inspection.
- Sprinklers, detectors and alarms. Adding or removing partitions usually means sprinkler heads and smoke detectors need relocation or addition to maintain coverage. This must be designed and installed by accredited fire contractors.
- Emergency and exit lighting. Directional exit signs, emergency lighting and path markers must all still meet coverage requirements once your new layout is in place.
On your side, you can reduce headaches by asking your team to show egress diagrams and fire service layouts clearly on drawings. During site walks, double check that the built result matches that documentation, especially in dense workstation areas, meeting room corridors and storage zones.
How Do Accessibility And DDA Requirements Affect Office Fitouts?
Accessibility is both a legal obligation and a practical design requirement. Under the Disability Discrimination Act and related access standards, you must provide access that does not discriminate against people with disability.
Core Accessibility Principles For Offices
Use these principles as a quick reference during design reviews.
- Continuous accessible paths. People should be able to reach the tenancy, move through reception, circulation corridors and key facilities along routes that meet access standards for width, slope and surface.
- Doorways and clear openings. Doors and gates must provide minimum clear opening widths, and circulation space around them must allow a person using a mobility aid to approach and pass through.
- Ramps and level changes. Any level change above small thresholds generally needs a compliant ramp or lift solution, with handrails and landings where required.
- Amenities. Accessible toilets and, where applicable, showers must be provided and located on accessible paths of travel.
- Signage and wayfinding. Signage should support people with vision impairments and other accessibility needs through size, contrast and placement.
- Workstations and meeting rooms. At least a proportion of desks, meeting spaces and collaboration zones should be accessible and adaptable, with adequate circulation and reach ranges.
Ask your designer and certifier explicitly whether the proposed layout maintains or improves compliance with relevant access standards. If your fitout removes or relocates accessible facilities, you must resolve that in design before construction starts.
What Sustainability Expectations Apply To Australian Office Fitouts?
Sustainability is no longer a fringe add on. Landlords, staff and clients now expect some level of environmental responsibility in office projects. Done properly, sustainable choices also lower running costs and improve comfort.
Common Sustainability Drivers In Australian Offices
- Corporate ESG goals. Many organisations have environment, social and governance targets that filter down into design briefs.
- Building owner requirements. Some buildings require tenant works to support overall building ratings, for example, targets around energy use or material selection.
- Staff expectations. Teams increasingly look for workplaces that feel healthy, with natural light, indoor plants and low odour materials.
You can treat sustainability as a series of practical design and product choices instead of an abstract policy. The main levers sit in materials, furniture, services and operations.
How To Integrate Green Materials Into Your Office Fitout
Material choices shape both the look of your office and its environmental footprint. You can lift sustainability by changing how you specify, not just what you specify.
1. Use Recycled And Low Impact Materials
- Flooring and finishes. Consider products with recycled content, low volatile organic compound emissions and strong durability. Longer life usually means lower environmental impact across the product lifecycle.
- Joinery and timber. Ask for responsibly sourced timber and board products that meet relevant environmental certifications where available.
- Partitions and acoustic panels. Many systems now use recycled cores or fabrics. Ask suppliers to outline environmental attributes, then factor that into selection, not only cost and appearance.
Make it clear to your design team that environmental performance is part of the selection criteria for all major finishes, not just a nice to have if it fits the budget at the end.
2. Reuse Where It Makes Sense
One of the simplest sustainable moves is to reuse what already exists, if it suits your new layout and meets safety requirements.
- Retain and adapt existing partitions that already align with your new room locations.
- Reuse ceiling grids and lighting where condition and layout allow.
- Refurbish or integrate good quality existing furniture, such as boardroom tables, storage and lounges.
When you brief your designer, ask them to identify where reuse is practical and where it is smarter to replace items due to performance, safety or maintenance issues.
3. Choose Furniture With Longevity And Flexibility
Short life furniture is bad for budgets and for the environment. Focus on systems that can move and adapt as your business changes.
- Modular workstations that can reconfigure into different layouts without new components.
- Durable desks with replaceable tops or legs so you can refresh surfaces without scrapping entire units. You can see this approach in ranges such as Australian made office desks that are designed for long term commercial use.
- Quality task seating with replaceable parts rather than full replacement when one component fails.
Pay attention to warranty periods and serviceability. Products that can be repaired locally reduce waste and downtime.
Designing For Energy Efficiency And Lower Running Costs
Energy efficiency is where sustainability and cost savings intersect. Good decisions at design stage reduce your utility spend and support any building or corporate energy targets.
1. Lighting Design And Controls
- Efficient fittings. Use high efficiency lighting that meets required lux levels with lower power draw.
- Controls and zoning. Break your tenancy into sensible lighting zones, such as open offices, meeting rooms and breakout areas, and use sensors and timers where appropriate so lights are not on in empty spaces.
- Daylight use. Plan workstation layouts to capture natural light where possible while controlling glare with blinds and screen placement.
Ask your electrical designer or contractor to provide a clear summary of lighting power density and control strategy so you can see the efficiency story, not just a fixture list.
2. Mechanical Services And Thermal Comfort
Air conditioning is one of the biggest energy consumers in commercial offices. Even if you cannot change the base system, you can influence how effectively it runs.
- Coordinate new partitions and ceilings so they do not block air flow or create hot and cold spots that force the system to work harder.
- Group high occupancy spaces where you can control temperature for that zone without overcooling or overheating others.
- Work with mechanical engineers to review diffuser locations once your layout is set so each area receives appropriate air distribution.
Improved thermal performance also feeds into comfort and productivity, not just energy use.
3. Appliances, Equipment And Standby Loads
It is easy to forget how many small energy draws sit inside a modern office. When you plan your fitout, think about:
- Efficient appliances in kitchens and breakout areas.
- Power rails and IT setups that support equipment being switched off or put into low power modes when not in use.
- Centralised printing and storage to reduce the need for multiple small devices scattered across the floor.
Include these items in your technology and furniture brief so they are not treated as last minute purchases with no efficiency criteria.
Can Your Fitout Support Green Building Ratings Or Internal Targets?
Some organisations aim for formal building or tenancy ratings. Others simply want to show progress against internal sustainability metrics. In both cases, your fitout decisions will affect what you can claim.
Planning For Ratings Or Targets
Use this framework if ratings or internal metrics matter to you.
- Clarify goals upfront. State clearly in your brief whether you are targeting a formal rating, an internal metric, or alignment with your landlord’s sustainability objectives.
- Engage relevant consultants early. If specialist input is needed, you want their advice before design is locked in, not as a late compliance check.
- Document sustainable choices. Keep records of material selections, furniture specifications, equipment efficiencies and any reuse strategies. This helps when you need evidence for ratings or corporate reporting.
Even if you are not chasing formal certification, this approach gives you a clear narrative for staff and clients about how you approached sustainability in your office project.
A Practical Compliance And Sustainability Checklist For Your Fitout
Use this checklist across design, tender and construction phases so nothing important falls through the gaps.
- Regulatory framework confirmed
- NCC classification and applicable sections identified.
- Key Australian Standards relevant to the project listed.
- State or territory WHS obligations considered in design and construction planning.
- Local council and building management requirements obtained and shared with the team.
- Fire and life safety addressed
- Egress paths, exit widths and travel distances checked on drawings.
- Fire doors and fire rated walls identified and treated correctly.
- Sprinkler, detector and alarm changes designed by accredited contractors.
- Emergency and exit lighting layout updated to suit the new plan.
- Accessibility and DDA compliance reviewed
- Continuous accessible paths through the tenancy confirmed.
- Door widths and circulation spaces meet access requirements.
- Accessible sanitary facilities are provided and on an accessible route.
- Accessible workpoints and meeting spaces are included in the layout.
- Sustainable materials and furniture specified
- Key finishes selected with recycled content or low emissions where available.
- Reuse of suitable existing elements considered and documented.
- Furniture chosen for durability, modularity and serviceability. For workstations and desks, consider ranges similar to Australian made commercial desks that are built for long term use.
- Energy efficiency integrated
- Lighting design uses efficient fittings and sensible zoning with controls.
- Mechanical design checked for effective air distribution with the new layout.
- Appliance and equipment specifications consider efficiency and standby loads.
- Documentation and approvals in place
- Compliance responsibilities allocated between designer, builder and certifier.
- Building management approvals granted before construction.
- At handover, certificates, as built drawings and manuals collected and filed.
Compliance and sustainability are not separate from design. They are part of what a good Australian office fitout looks like in 2026. When you build these requirements into your brief and hold your providers to them, you end up with a workplace that is safe, accessible, efficient and more resilient over its full life, not just impressive at opening day.
Office Fitouts In Melbourne: What Makes This Market Unique?
If you are planning an office fitout in Melbourne, you are not dealing with a generic Australian market. Melbourne has its own mix of building stock, workplace culture and landlord expectations. If you understand those local quirks upfront, you plan better, negotiate smarter and avoid nasty surprises once you hit construction.
How Melbourne’s Office Stock Shapes Your Fitout
Melbourne’s commercial spaces fall into a few broad buckets. Each one affects how you design, what you spend and how long the work takes.
- Older CBD towers
These buildings often have lower ceilings, smaller floor plates and quirky cores. Services can be more constrained and risers crowded. That usually means:- More coordination with base building engineers when you move air conditioning, power or data.
- Tighter limits on penetrations for power poles, floor boxes or wet areas.
- Access restrictions for bulky items, which affects delivery and demolition planning.
- Premium and A grade towers
These newer buildings usually offer strong base services, higher ceilings and more flexible floor plates. They also come with:- Strict fitout guidelines for ceilings, lighting, façade interfaces and penetrations.
- Higher expectations around visual quality in front of house areas.
- Closer scrutiny from building management on documentation and contractor behaviour.
- Fringe and warehouse style spaces
In fringe precincts you often see exposed services, polished concrete floors and less formal aesthetics. They can be more forgiving visually, but still require:- Careful acoustic planning, because hard surfaces bounce sound around.
- Services checks to make sure the chilled beams, split systems or older plant can support your headcount.
- Thoughtful selection of meeting and boardroom furniture so informal spaces still feel professional when clients visit. For instance, you might pair relaxed lounges with a strong boardroom focal point using a piece from a dedicated Melbourne focused collection such as boardroom tables for sale in Melbourne.
The key point is that the same layout will behave differently in an older CBD tower, a premium core or a converted warehouse. Always align your concept with the physical reality of the building, not just with a mood board.
Melbourne Tenants Expect Design Depth, Not Just Compliance
Melbourne has a strong design culture. Staff and clients are used to well considered hospitality venues, retail and public spaces. That expectation flows straight into commercial offices.
Most Melbourne tenants now aim for more than a compliant grid of desks. They want:
- Clear design narrative, where reception, breakout and work zones feel connected rather than patched together.
<liStrong meeting and collaboration settings</li, because hybrid meetings are constant and in person sessions need proper support.
- Quality finishes in key zones, such as reception counters, meeting tables and visitor seating, instead of budget products in front of clients. For instance, pairing a robust boardroom base with integrated power boxes from ranges like boardroom table power boxes helps match Melbourne expectations for tech ready spaces.
- Distinctive but durable details, such as feature walls, planting and lighting that create identity without becoming dated quickly.
When you scope your project, allow room in the budget and program for concept design, not just space planning. Purely functional plans often look out of place in Melbourne’s more design conscious precincts.
Cost Considerations Specific To Melbourne
Melbourne fitout costs per square metre sit within the Australian bands you have already seen, but several local factors influence where your project will land inside those ranges.
1. CBD Versus Fringe And Suburban Locations
Your address impacts more than rent. It shapes construction costs, access and logistics.
- CBD towers often have:
- Strict work hours for noisy activity.
- Highly booked loading docks and goods lifts.
- Detailed rules for waste removal, deliveries and materials storage.
All of these add preliminaries and coordination costs to the per square metre figure.
- Fringe and suburban offices usually:
- Allow more flexible work hours.
- Provide easier parking and on grade access.
- Have less rigid base building rules.
That can reduce some preliminaries, but you still need to factor in services condition and any landlord driven upgrades.
2. Services Complexity In Older Stock
Melbourne’s older buildings can hide surprises above ceilings and behind walls. Common cost drivers include:
- Non standard or ageing air conditioning systems that require more modification.
- Cramped ceiling spaces with a tangle of old services, which slow down new runs for ductwork, lighting and data.
- Fire system layouts that need significant rework when you add or remove partitions.
The fix is simple. Insist on a proper site inspection and services review before anyone locks in cost per square metre or presents a glossy program. The extra time here saves you from major variations later.
3. Design And Furniture Choices In A Competitive Talent Market
Melbourne employers compete hard for staff, especially in professional, tech and creative fields. Offices are part of that competition. Budgets often stretch in three areas:
- Reception and client suite, to create a confident first impression.
- Meeting and project rooms, with better technology, acoustics and furniture for hybrid collaboration.
- Staff amenities, such as kitchens, quiet rooms and breakout zones that actually get used.
Understand this pressure before you set your budget. If your industry treats the office as a key part of the offer, build that into the brief and cost planning, rather than trying to “value manage” aesthetics at the end.
Regulatory Nuances For Melbourne Fitouts
The broad regulatory framework is national, but Melbourne projects always involve some local specifics. You need to align three sets of expectations, council, building management and state WHS regulators.
1. Building Management And Fitout Guides
Most Melbourne CBD and major fringe buildings have detailed tenant fitout guides. These documents sit alongside the lease and can contain requirements such as:
- Preferred or panel contractors for base building interface works.
- Design rules for ceilings, façade interfaces and shopfront style entries into lift lobbies.
- Mandatory acoustic separation between tenancies or between tenancy and lobby.
- Specific documentation formats and approval sequences before construction starts.
Never let your designer draw in isolation from these guides. Ask building management for the latest version and pass it straight to your design and fitout team.
2. Local Council And Heritage Considerations
In some Melbourne precincts, especially where heritage overlays or special planning controls apply, you may face:
- Restrictions on visible changes to street facing entries or windows.
- Requirements for acoustic performance if your office sits above hospitality or mixed use spaces.
- Extra review steps if you alter certain building elements connected to public space.
This does not affect most internal fitouts, but you need clear advice if you plan to change entries, signage or façade related elements.
3. State WHS Expectations In Live Environments
Melbourne offices often undergo staged fitouts while some staff remain in place. That raises the bar on WHS management. Make sure your provider can show you how they:
- Stage noisy and dusty works so they do not disrupt occupied areas.
- Separate construction zones using hoardings, signage and controlled access.
- Handle emergency egress while parts of the floor are under construction.
This is not just compliance. Poor staging damages staff trust and makes it harder to sell the benefits of the new space.
The Competitive Landscape Of Melbourne Fitout Providers
Melbourne’s office fitout market is crowded. You will see everything from one person design studios and small joinery focused builders through to large design and construct firms with in house trades and workplace strategists.
A few points to keep in mind when you shortlist providers for a Melbourne project:
- Ask for real Melbourne office experience, not just national coverage. You want people who know local building managers, trade availability and council nuances.
- Check their typical project size. Some groups specialise in compact spec suites. Others are set up for multi floor jobs. Pick a provider whose normal work sits close to your scale.
- Look at how they handle design quality. In Melbourne, aesthetics and functionality carry similar weight. You need a partner who can talk credibly about both, not just revert to a standard grid of workstations.
- Probe their furniture and supplier network. Strong local relationships with furniture, AV and services suppliers matter when something needs to be replaced or expanded quickly.
Use the national fitout provider selection checklist from earlier in this guide, but weight these Melbourne specific elements more heavily. The difference between an “Australia wide” generalist and a team that lives and breathes Melbourne offices shows up fast once approvals and site coordination start.
Practical Tips For Planning A Melbourne Office Fitout
To pull all of this together, use the following framework before you launch into detailed design.
1. Read The Building And Fitout Rules First
Before you brief designers, do three things:
- Get the building’s tenant fitout guide and any base building drawings you can access.
- Clarify construction hours, noise limits and loading dock rules with building management.
- Confirm any landlord works or incentives that come with your lease.
Feed these into your brief so you are not paying to design something that contradicts building rules.
2. Decide How “Melbourne” You Need The Space To Feel
Not every tenant needs a highly expressive design, but you do need to decide where you sit on that spectrum. Ask yourself:
- How important is the office in attracting and retaining staff in your industry.
- How often you host clients and at what level of formality.
- Whether you want your office to feel conservative, progressive, creative or hospitality influenced.
This informs everything from colour and material selections to how much you invest in reception, meeting rooms and breakout. It also affects furniture choices, for example, whether you lean toward classic boardroom tables or more contemporary forms from curated Melbourne ranges like those in Melbourne boardroom collections.
3. Allow Time For Coordination And Approvals
In Melbourne CBD buildings, approval lead times can absorb more of your program than the physical build. When you set dates:
- Factor in design review, building management approval and certifier review as separate steps.
- Plan for at least one iteration where the building or certifier asks for clarifications or minor layout changes.
- Lock in lift, loading dock and out of hours slots as early as your builder can.
Trying to compress approvals near lease expiry is where corners get cut and late compromises creep in.
4. Balance Flexibility With Identity
Melbourne tenants often want flexible layouts that can adapt to hybrid work and headcount shifts, while still feeling distinct. You can do both if you:
- Use modular workstation and storage systems that reconfigure without major construction.
- Invest in key identity anchors, such as reception counters, primary collaboration tables and lounge pieces, while keeping the bulk of desks and secondary tables more neutral.
- Plan power and data distribution so you can move team zones around within clear infrastructure bands.
This approach lets you adjust seating plans and team structures over time, while the space still feels like your office, not a generic leased floor.
A Simple Melbourne Fitout Planning Checklist
Use this checklist at the start of your Melbourne project so you catch the local issues early.
- Building context
- Identify building type, age band and services condition.
- Collect tenant fitout guide, base building drawings and any services reports you can obtain.
- Confirm construction hours, access routes, lift and loading dock rules.
- Lease and landlord
- Clarify landlord works, incentives and make good terms.
- Check any landlord design expectations for front of house areas.
- Design expectations
- Agree internally on how important design quality is for talent and clients.
- Define your desired look and feel in simple language, such as “professional and warm” or “minimal and contemporary”.
- Services and approvals
- Arrange an early services walk through with designers and contractors.
- Map the approval path with building management and a certifier.
- Provider selection
- Shortlist teams with clear Melbourne office experience.
- Demand site walks and detailed scopes before accepting any per square metre price.
Melbourne rewards tenants who respect the local context. When you combine sound Australian fitout fundamentals with a clear understanding of Melbourne buildings, design culture and market expectations, you end up with an office that works day to day and holds its own in a very competitive city.
Tips For Maximizing Return On Investment (ROI) Through Your Office Fitout
If you want real value from your office fitout, you need to think beyond “How much per square metre?” and focus on “What does this space help our people do better?”. ROI in an Australian office comes from three core outcomes, higher productivity, stronger collaboration and a sharper brand experience for staff and clients.
This section gives you practical frameworks you can use to design for those outcomes, plus clear strategies for flexible layouts, future proofing and technology that will still make sense several lease cycles from now.
1. Start With A Workplace ROI Blueprint, Not Just A Budget
Before you sign any design concepts, define what ROI looks like for your business. Use a simple blueprint so decisions stay grounded.
Build a one page ROI brief that answers these questions:
- Productivity: What specific friction points do you want to remove, for example, constant meeting room shortages, noise complaints, or people working across multiple locations for one task.
- Collaboration: Which types of collaboration matter most, such as quick daily huddles, hybrid client reviews, deep project work or training sessions.
- Brand and talent: What you want visitors and staff to say or feel when they walk through the door.
- Risk and compliance: Which WHS or ergonomic issues you want the new fitout to address directly.
- Flexibility: How much your headcount and work style are likely to move over [insert timeframe].
Keep this ROI brief on the table in every design and cost meeting. If a feature does not support at least one of those outcomes, question why it is there.
2. Design For Productivity: Reduce Daily Friction First
Productivity ROI rarely comes from gimmicks. It comes from cutting the everyday friction that slows people down and wears them out.
Use A “Friction Audit” Before Finalising Layouts
Ask team leaders and staff to identify the top [insert number] pain points in the current office. Typical items include:
- No quiet places for focus work or private calls.
- Constant battles for meeting rooms, especially small rooms for [insert number] people.
- Poor acoustics in open plan zones.
- Storage scattered randomly, so people walk long distances for basic items.
- Uncomfortable seating, bad lighting or glare at workstations.
Then, instruct your designer to show, on a plan, exactly how the new layout addresses each point. For example, more small focus rooms, acoustic zoning, consolidated storage or better ergonomic workstation planning. That direct line between pain point and design response is where productivity ROI starts.
Prioritise Work Settings That Get Used Daily
Put more of your budget into spaces your team uses every day, not the rooms that look great in photos but sit empty.
- Core workstations, with proper ergonomic chairs and desks, because that is where most focused work happens.
- Small meeting and focus rooms, because hybrid calls and one to one conversations are constant in Australian offices in 2026.
- Circulation and shared resources, with logical printer points, storage and lockers so people are not wasting minutes every time they need something.
If you need to save, do it on rarely used spaces, for example, a large training room that only runs sessions a few times per [insert timeframe]. Design it flexibly, with folding tables and stackable chairs, rather than locking in a high cost permanent setup.
3. Design For Collaboration: Right Spaces, Right Sizes, Right Tech
Collaboration ROI comes from having the right mix of rooms and settings, sized and equipped for how your team actually works, not how a brochure says offices should work.
Map Collaboration Types To Setting Types
Use this framework to plan collaboration spaces.
- List your key interaction types, such as:
- Quick stand up huddles.
- Small internal problem solving sessions.
- Hybrid client meetings with screens and shared content.
- Heads down project work for [insert number] people across several hours.
- Workshops and training sessions.
- Assign each interaction to a setting, for example:
- Huddles, at high bar tables in open collaboration zones.
- Small meetings, in enclosed rooms with simple AV.
- Hybrid client sessions, in better equipped meeting rooms with quality tables and visitor seating. For a benchmark of what supports that, you can review options like the pieces shown in guides to quality meeting tables.
- Quantify peak simultaneous use for each interaction type so you know how many rooms or zones you actually need.
This approach stops you from overbuilding big boardrooms and underbuilding the small rooms and project spaces that carry most of the collaboration load.
Focus Hybrid Capability Where It Matters Most
You do not need full AV in every room. That approach wastes budget and complicates support. Instead, decide:
- Which rooms host regular external or cross city meetings and need reliable cameras, microphones and screens.
- Which rooms support mainly in person work, where a screen is enough.
- Which collaboration points only need power, Wi Fi and maybe a mobile screen.
Spend more on fewer, well used hybrid rooms, with proper audio and integrated power, then keep the rest simple and robust. That mix gives you ROI in meeting quality without overspending on tech that sits idle.
4. Design For Brand And Perception: Make Key Moments Count
Your office tells a story about how you operate. A small number of “high impact moments” deliver most of the brand ROI.
Identify Your High Impact Journeys
Map the path of two groups.
- Clients and visitors: From building lobby, to reception, to meeting room, to amenities, to exit.
- Staff: From entry, to locker or storage, to workstation, to collaboration spaces, to kitchen or breakout.
Then ask what you want each group to think during that journey. For example, “These people are professional and organised.” or “This feels open, approachable and modern.” Use finishes, lighting, furniture and signage along those paths to deliver that impression.
Think carefully about reception, visitor seating and main meeting rooms. Simple upgrades here deliver far more perceived value than over styling back of house areas. If you want reception and visitor seating that matches that story, look at how curated ranges of premium lounge chairs for Australian offices approach comfort and visual impact.
5. Build Flexibility In From Day One
Flexible design is one of the strongest ROI levers. It reduces future churn costs when you grow, shrink or change work patterns.
Use A “Flexibility By Category” Plan
Decide what must be fixed and what should remain moveable.
- Keep these as fixed as possible:
- Wet areas, such as kitchens and bathrooms.
- Main comms rooms and riser connections.
- Fire rated walls and primary escape paths.
- Keep these as flexible as possible:
- Team zones and workstation groupings.
- Project rooms versus standard open plan areas.
- Informal collaboration and breakout locations.
Flexibility comes from smart infrastructure. For example, power rails and floor ducting that allow desks to move within a zone without new core holes, demountable partitions that can shift to resize rooms, and modular workstation systems that can convert from singles to back to back runs without replacing everything.
Design Hot Desking And Lockers Properly
Hybrid work makes personal storage and desk allocation a key ROI decision. If you want to support shared desks without chaos:
- Specify enough lockers or secure storage for people who do not have permanent desks. For reference on options, you can review dedicated products for office lockers in Australian workplaces.
- Standardise desk setups, so whoever sits down has the same monitor arms, power and cable management.
- Back hot desking areas with nearby touchdown spots and quiet rooms, so people have realistic alternatives if all desks are occupied.
Well designed hot desking and storage protects your investment in desks and chairs by keeping them clear, tidy and used as intended.
6. Future Proof Technology Without Overcomplicating It
Tech spend goes to waste when it is locked into one way of working. You want infrastructure that can shift with software, devices and meeting habits.
Separate Infrastructure From Devices
Think in two layers.
- Infrastructure layer: Power distribution, data cabling, Wi Fi coverage, server or rack rooms, ceiling or wall reinforcement for future screens.
- Device layer: Screens, cameras, microphones, hubs and booking systems.
Spend to make the infrastructure flexible and robust, because that is expensive to change later. Stay more conservative with devices that are easy to replace as platforms change.
Use A Tiered Tech Strategy For Rooms
Instead of specifying the same kit everywhere, create tiers.
- Tier 1: High value rooms with full hybrid capability, reliable cameras, proper microphones, in table power and cable management.
- Tier 2: Everyday internal meeting rooms with good screens and simple connections.
- Tier 3: Informal zones with power access and possibly mobile screens, but no fixed AV.
Review room usage every [insert timeframe] after move in. If a Tier 2 room becomes critical for external meetings, you can justify upgrading the device layer without ripping out services or joinery.
7. Connect Your Fitout To Measurable Business Outcomes
To really see ROI, you need basic measurement before and after the move, even if you keep it simple.
Use A Light Touch Measurement Framework
Before design, capture baseline information such as:
- Average meeting room utilisation and no show rates.
- Staff feedback on noise, comfort and ability to focus.
- Rough time lost to hunting for rooms, equipment or storage each week.
After you move into the new office, check the same measures after [insert timeframe]. You are looking for clear shifts, such as reduced noise complaints, higher satisfaction with focus work, or smoother hybrid meetings. These observations make it easier to justify the investment to leadership and guide tweaks over time.
8. A Practical ROI Checklist For Your Office Fitout
Use this checklist during design reviews and pre construction meetings to keep ROI front and centre.
- Productivity
- Top [insert number] friction points from the old office identified and addressed explicitly in the new design.
- Workstations, focus rooms and circulation designed to reduce interruptions and wasted movement.
- Ergonomic standards applied to all regular workpoints, not just a subset of desks.
- Collaboration
- Key collaboration types listed and matched to specific room or setting types.
- Room sizes and counts grounded in peak simultaneous use, not guesswork.
- Hybrid meeting capability focused on rooms that truly need it, with reliable AV and power.
- Brand and talent
- Visitor and staff journeys mapped, with deliberate design focus on high impact touchpoints.
- Reception, primary meeting rooms and key breakout spaces specified to match your brand story.
- Furniture and finishes in front of house spaces chosen for both durability and impression.
- Flexibility and future proofing
- Fixed elements limited mainly to wet areas, primary services and fire related construction.
- Power and data planned in zones to support reconfigurable workstations.
- Modular furniture systems selected for desks, storage and collaboration tables where possible.
- Technology strategy
- Infrastructure layer (power, data, Wi Fi) designed for future capacity and rearrangement.
- Room tech specified in tiers, aligned to expected use.
- Clear plan for device refresh cycles and support responsibilities.
- Measurement and continuous improvement
- Baseline workplace feedback and utilisation captured before the move.
- Post occupancy review scheduled after [insert timeframe] to pick up quick wins and small adjustments.
- Ownership assigned inside your business for ongoing workspace tweaks, not just one off project delivery.
ROI from an office fitout is not mysterious. When you tie every major design and spend decision back to productivity, collaboration, brand and flexibility, and you plan technology and furniture around real Australian work patterns, you end up with a workplace that keeps paying you back every day, not just looking impressive on opening week.
Conclusion And Next Steps
You now have a clear picture of what a professional office fitout in Australia involves. You know how costs are structured, how to plan a project from brief through to handover, how to choose a layout that matches your work style, what ergonomic and WHS responsibilities you carry, how compliance and sustainability fit in, and what makes markets like Melbourne behave differently.
The real value comes from what you do next. So let us turn this guide into a practical action plan you can start on this week.
Step 1: Turn This Guide Into Your Project Blueprint
Start by pulling the key decisions into one short internal document that you can share with leadership and any external partners.
Include at least:
- Project objectives, such as productivity improvements, collaboration goals, brand outcomes and WHS priorities.
- Scope headline, for example, new tenancy fitout, partial refurbishment, or furniture led refresh.
- Budget band, using the cost per square metre levels in this guide as reference, with an overall target spend that includes build, furniture, tech and professional fees.
- Timeframe, aligned to lease dates, notice periods and any fixed milestones.
- Preferred layout direction, open plan, hybrid or activity based working, with a sentence on why.
This does not need to be a complex report. A few clear pages are enough. The aim is to create a single source of truth before you speak to designers or builders.
Step 2: Lock In Your Non Negotiables
Every project hits trade offs. If you have not decided your non negotiables in advance, you will end up making random compromises under time pressure.
Use the themes from this guide to set your priorities.
- Compliance and WHS. These are never optional. Confirm that building code, fire safety, accessibility and ergonomic requirements sit at the top of the list.
- Ergonomic workpoints. Decide how many fully ergonomic desks and chairs you need as a minimum, including for hybrid workers who are in regularly.
- Focus and collaboration balance. Set a clear expectation for how many focus rooms, huddle rooms and hybrid ready meeting spaces you need at peak use.
- Brand critical zones. Nominate the areas where you will not cut corners, typically reception, primary meeting rooms and staff breakout.
Write these into your brief as firm requirements, not preferences. That makes it much easier to resist cost cutting that hurts long term performance or compliance.
Step 3: Assemble The Right Local Expertise
You do not need to carry the technical detail in your head. You do need to surround yourself with the right local capability.
For most Australian office projects you will want access to:
- A workplace designer or architect with commercial office experience in your state or territory.
- A fitout contractor or design and construct partner who can price, program and deliver in your specific building type.
- Services consultants or specialist contractors, for mechanical, electrical, fire and data where your base building is complex.
- A certifier or building surveyor who can guide you through NCC and approval requirements.
- Furniture and ergonomic specialists who understand Australian ergonomic standards and WHS expectations.
Use the provider selection frameworks earlier in this guide to shortlist candidates. Treat references, licences, insurances and real commercial experience as entry tickets, not nice extras.
If you want a starting point for furniture and ergonomic advice that is already aligned with Australian offices, you can speak directly with the Officely team through the contact page at Contact Officely. They can help you translate your brief into practical workstation, seating and meeting room packages that match the planning principles in this guide.
Step 4: Build A Simple But Firm Project Structure
Once you have your brief and your early team in place, set up a structure that keeps the project under control from day one.
At minimum, put these in place:
- A project owner inside your organisation, usually an office manager, operations lead or similar, with clear authority to make day to day decisions.
- A governance rhythm, such as fortnightly design meetings in early stages, then weekly site or program meetings during construction.
- Document control, one place where current drawings, specifications, approvals and change records sit, accessible to all key parties.
- Decision gates, for example, a formal sign off at concept design, at detailed design, pre tender, and pre construction.
You can run this structure with a simple combination of shared folders, documented agendas and clear email summaries. The critical piece is consistency. The fewer surprises your team faces, the smoother your fitout will run.
Step 5: Use The Checklists As Live Working Tools
Across this guide you have seen structured checklists for:
- Fitout cost components and per square metre inclusions.
- Planning steps from needs assessment through to handover.
- Office layout selection and settings planning.
- Ergonomic requirements for desks, chairs and layouts.
- Fitout provider evaluation.
- Regulatory compliance and sustainability.
- ROI and workplace performance.
Do not treat these as theory. Print them, or convert them into your own internal templates, and walk through them during meetings with designers, builders and landlords. If an item is marked “to be confirmed” for too long, call it out and assign someone to close it.
This is how you avoid scope gaps that later show up as cost variations, delays or compliance issues close to move in.
Step 6: Plan For Life After Handover
A fitout project does not end when the last trade leaves. It only delivers value if the space works in live use.
Before construction finishes, plan how you will handle:
- Staff induction, including workstation setup, ergonomic training and how to use hybrid meeting rooms and booking systems.
- Post occupancy review, a check in after [insert timeframe] to see what is working, what is not and what quick adjustments will help.
- Minor tweaks and additions, such as adding a couple of extra lockers, swapping some meeting chairs or adjusting AV settings.
- Ongoing WHS and maintenance, making sure certificates, manuals and as built drawings sit where your safety and facilities teams can access them.
Assign responsibility for “workspace performance” to a specific role, not just to a project committee that disbands after handover. That person becomes the link between staff feedback and small, high value changes over the life of the tenancy.
Step 7: Know Where To Get Further Guidance
If you want to go deeper on specific topics covered in this guide, or you need a sounding board for your early plans, you have several options in the Australian context.
You can:
- Speak with commercial fitout consultants and workplace designers in your city who specialise in office environments and understand local building conditions.
- Engage WHS advisors who can review your emerging design against ergonomic and safety expectations for Australian offices.
- Contact industry bodies and professional associations that relate to building, design or WHS in your state or territory for general guidance and references to relevant standards.
- Work with suppliers who focus specifically on commercial office furniture, workstations, seating and accessories for Australian workplaces.
If you want advice that integrates design intent with practical furniture and ergonomic solutions, Officely’s team can step in as an early stage partner. You can outline your project and request a conversation or proposal through Request a Quote, then compare their approach with other providers using the selection frameworks in this guide.
Your Next Concrete Move
You do not need to solve the whole project today. You only need to take the next clear step.
If you are right at the start, that step is to draft your internal brief using the objectives, cost bands and layout options we have covered. If you already have a brief, your next move is to test it against the checklists here and see what is missing before you go to market.
The more disciplined you are now, the less you will spend later on rework, rushed decisions and patching avoidable mistakes. With this guide in hand, you are already ahead of most tenants in the Australian market. Use it, ask direct questions, and demand the same level of clarity from every provider who wants your fitout work. Your future office, and your team, will feel the difference every day they walk through the door.